When designing custom folding cartons the term “dieline” is something you will hear a lot. It may seem like a very technical term but it is fairly simple, yet crucial, to the production of your custom-printed boxes.
So, what is a dieline?
3-dimensional folding cartons are formed out of 2-dimensional sheets. A dieline indicates how the flat sheet will be cut, perforated, folded, and glued in order to transform it into a 3D product. This dieline also provides the guide you will use to create the artwork to be printed on your folding cartons.
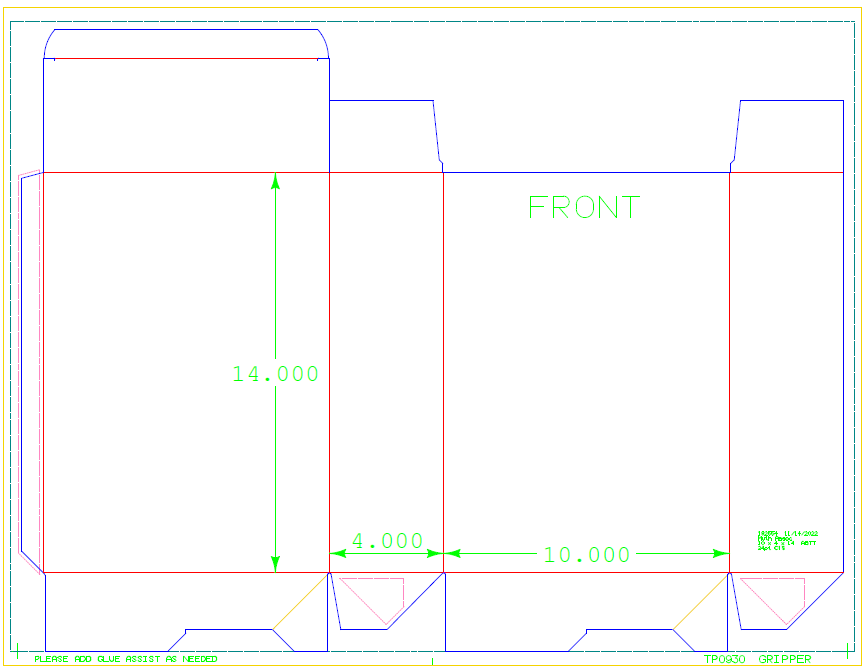
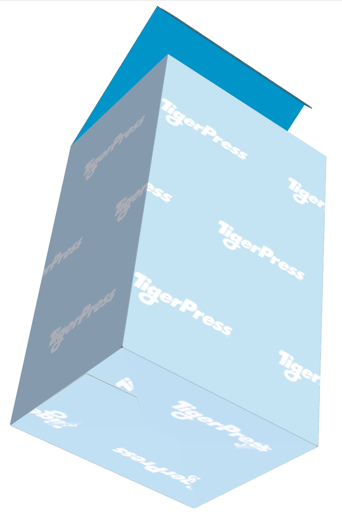
This is what a typical auto bottom-tuck top (ABTT) folding carton dieline will look like. The image next to it shows what an ABTT box looks like when set up.
In production, the dieline is used to create a die that will be used to cut, score and perforate printed sheets so they are ready to be folded and glued to form folding cartons.
That may seem like a lot of technical jargon.
Let’s look at a close-up of part of this dieline and define some of the terms.
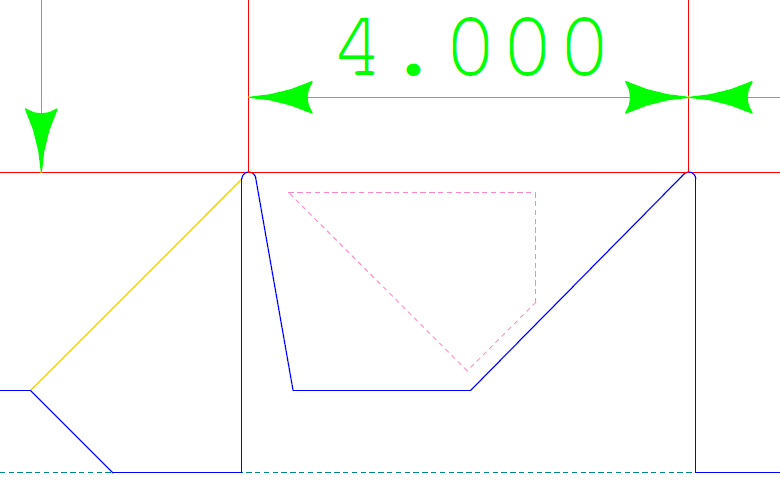
Cut Lines: Shown as blue lines, these define how the folding carton will be cut out of a flat sheet before being folded and glued to make the final product.
Fold Lines: The red lines indicate where your folding carton will be scored for folding. Folding cartons will arrive flat and will pop up to form a carton that is ready to use.
Perforation Lines: Yellow lines show where the carton will be perforated. Perforations can be used to either allow for sharp folds at corners or easier folding for set-up
Knock-out Area: Indicated by pink dotted lines, these areas will be glued. All ink and coating is kept out of this area so the glue will adhere properly to the paperboard.
Glue Assist: They indicate a creative strategy to provide extra strength, when needed, at high-stress glue points. The paper is cut halfway through the sheet to allow the glue to penetrate the surface to form a stronger bond with the paper fibers.
TigerPress can help you create a dieline.
To do this we must understand what type of package you need.
- Do you have an existing packaging design or a sample of a box that is close to what you want? Providing these to us gives our designer a good starting point.
- What are the weights and dimensions of the contents? It is helpful to have a sample of the contents so a prototype can be tested.
- Do you want special features included in your package such as locking tabs for tuck flaps or a tear-off strip to make your package easy to open? Maybe your package needs to hang on a peg. In that case, you will need to incorporate a hanging feature. Will your box stand on the end or lay down? All of these factors affect the style of the box and therefore the dieline for your package.
Once we have this information from you, we will provide blank sample boxes that you can test before preparing artwork for your package. It is critical that you test these samples thoroughly to assure that the final product will meet your needs.
Once you approve the design of the box, we will provide you with the dieline that will be used to create that box. Then your designer can use the dieline as a template for the artwork to go on your package.
Think of the dieline as the blueprint for your package. Visualizing how a 2-dimensional sheet folds to make a 3-dimensional package can be challenging at first. Once you learn how to read a dieline you will be a more effective packaging buyer. Our staff is here to answer any questions that you have about your packaging needs.